Free shipping on qualifying domestic orders over $50
Lots of Layers with Briana
September 19, 2016
Greetings Artistcellar fans!
I hope life is treating you well.
Today I have a stepped out tutorial of a layered art piece to share with you using the following supplies:
- Mineral Paper
- Jacquard Dye-Na-Flow Liquid Color
- Kaleidoscope Series Stencils
- A cosmetic wedge or two
- Acrylic paint
- Dylusions Paint
- Paintbrush-½ inch
- Paper towel
Before I get into the step-by-step process, I have to tell you something. The NEW Mineral Paper Pad is really, really awesome! The paper is made from rocks, not trees. The paper feels smooth, thin, yet sturdy for both wet and dry media. You neeeeeed to check out this paper!
Step 1:
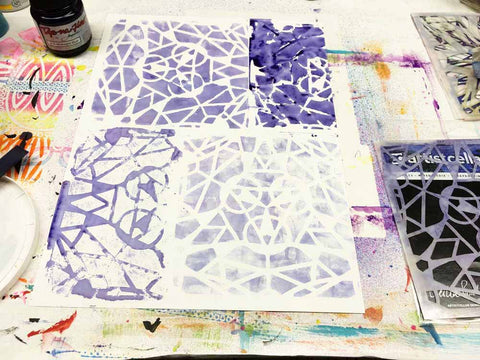
Choose an artistcellar stencil you like, and with a cosmetic wedge, dab a color of Dye-Na-Flow through the stencil. (Here I am using the Trillium stencil with Midnight Blue Dye-Na-Flow).
Step 2:
Try different ways of applying the Dye-Na-Flow. Pictured above, the right corner was done using a paintbrush. Then I flipped the stencil over (bottom left) to make a print and rubbed a little color around with a paper towel. All of these variations make for an interesting background layer.
Step 3:
Complete the page with one more use of the stencil. (I used the cosmetic wedge again).
Step 4:
Choose a contrasting color of acrylic paint to dab through a different stencil. (Here I am using the Sun Flower stencil from the Kaleidoscope Series.)
Step 5:
Continue playing with placement of this second stencil.
Step 6:
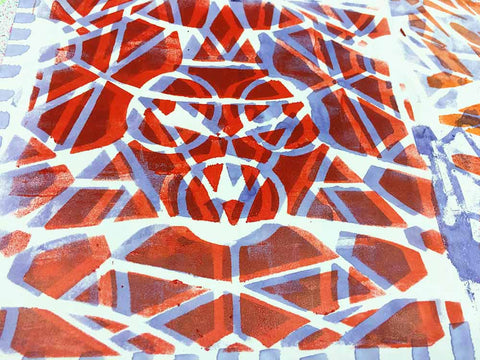
Next I pulled out the Dylusions Paint. One thing I love about this paint is that it is semi-transparent, which makes it perfect for mixed media layering techniques!
Grab the first stencil you were using and place it slightly off-center on an area where you previously used that stencil.
When you remove the stencil you will see the following results:
Pretty cool, right?
Step 7:
Do the slightly off-center technique one more time. You might want to choose a new paint color, or a variation of your contrasting color.
And here you go!
So, that sort of looks like a jumbled mess now, would you agree?
This is all a part of the creative process and the layering process. It’s sort of like the “teenager” stage.
Let’s tie things together.
Step 8:
Add a unifying color (I used yellow Dye-Na-Flow) to part of your piece.
Step 9:
Add a focal image or symbol. (I painted a red spiral using a ½ inch paintbrush and Dylusions Paint).
When I finished this piece, I was pleased with the lightweight Mineral Paper. The piece could easily be framed or turned into a flag on a banner (you know, with ribbon or string and multiple “flags” hanging down). Of course, there is always the possibility of cutting and tearing for your mixed media collage creating pleasure!
In Summary, I hope you’ll try the NEW Mineral Paper Pad from artistcellar. It is quite amazing stuff! Also, try to remember that there are many stages when creating a layered piece. It’s normal to have a stage that you really don’t care to look at. Usually, more layers will take care of the issue, as well as adding a focal point.
Have fun and enjoy your art supplies!
Blessings,
Briana of OrangeSpiralArts.com
SaveSaveSaveSaveLeave a comment
Comments will be approved before showing up.


