Free shipping on qualifying domestic orders over $50
Make a Handmade, Single Signature, Art Journal with Briana
June 27, 2016
Hello Everyone!
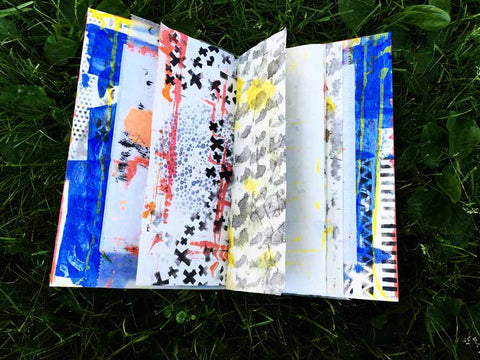
You may not know this about me, but I am a huge book arts fan. I love artists’ books, handmade journals, and the like. Today I am going to share an easy way to make your own mixed papers, single signature, art journal.
Here are the supplies you’ll need to gather:
- One -11x14 sheet of hot press watercolor paper (or any size you want)
- your favorite stencils sold on artistcellar.com
- acrylic craft paint
- a paint palette
- cosmetic wedges (for applying paint)
- a paint scraper
- a pencil
- one sheet of 8.5 x 11 cardstock
- extra copy paper
- Faber-Castell Graphite Aquarelle pencil-8B
- A paper slicer (which can double as your ruler)
- A ruler
- A bone folder, binding needle, and waxed linen thread
- Various papers from your art studio or paper stash
The Cover and Inside Pages
I love hot press (smooth) watercolor paper. When Fabriano came out with this pad a year or so ago, I was thrilled! It works great for a sturdy cover.
Fold one sheet of 11x14 hot press watercolor paper in half, with the grain of the paper. In this case, the grain runs short, so make a “hamburger fold”. (See below)
Once your cover paper is folded, it’s time to get out those stencils and paints!
Scrape a few colors of paint on the outside of the cover.
As you work on the cover, have extra copy paper underneath your painting spot. Use this extra paper for the inside pages of your journal. You can even stencil on them as you give your cover a chance to dry!
Work back and forth between the cover (both inside and outside) and the loose sheets of paper for the inside pages. Pictured below is the second layer on the front cover.
Pictured below is the second layer on the back cover. I am using an 8B Faber-Castel Graphite Aquarelle pencil to do a stencil rubbing.
Pictured below is some stencil work and Dye-Na- Flow drips on the inside cover.
Scrape paint on the inside cover, over the drips and stencil work. Doodle on the outside of the cover with the Faber-Castel Graphite Aquarelle pencil. Then add a third layer of paint to the cover using a stencil and white acrylic paint.
Sewing the Signature To bind your single signature book, you will need a ruler, or a paper slicer that has a ruler on its surface. We are going to be doing a 5-hole pamphlet stitch.
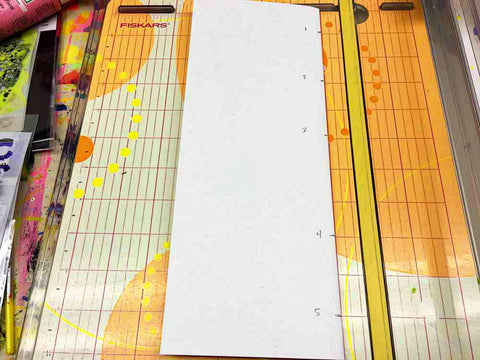
First, you need to make a hole-punching guide, using a piece of cardstock, a ruler, and a pencil.
Fold the piece of cardstock in half lengthwise, or a “hotdog fold”.
Measure one inch from the bottom and one inch from the top, and place a pencil dot. Put a dot at the center of the punching guide. Put two more dots in between the dots you already have. (See below).
Label your marks from top to bottom, 1 -2- 3- 4- 5.
Reverse the fold of the punching guide, so the numbers are now on the inside of the fold.
Gather 5-7 pieces of artsy paper to be the inside pages of your journal. Fold them, and place the punching guide at the center of your papers.
Place the folded papers and the punching guide inside an open phone book or on a thick piece of foam.
Use an awl to punch the holes for sewing.
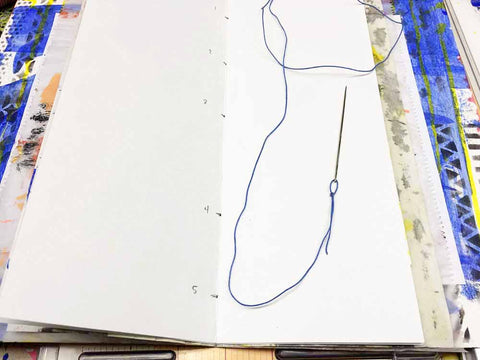
Thread a bookbinding needle with waxed linen thread. The thread should be about 2x the length of your journal. Be sure to tie a loose knot about two inches up from the end of your thread and also near the head of the needle.
Important Note: If you want the loose threads to be on the outside of your journal, start sewing on the outside in hole 3. If you want to tie off your sewing on the inside of your book, begin on the inside in hole 3.
Use your hand or clips to hold your pages in line with the sewing holes once everything is punched. The pattern for sewing is:
You will be making an inside to outside, outside to inside, weaving pattern as you sew. For simplicity, write the sewing pattern on your punching guide as: 3-4- 5-4- 2-1- 2-3 Choose to start from the inside or the outside of hole 3, depending upon where you want your final tied threads to reside.
TA DA! You bound a book! Congratulations!!!
For more art ideas and mixed media inspiration, be sure to stop by OrangeSpiralArts.com
Blessings to YOU!
Briana
SaveSaveSaveLeave a comment
Comments will be approved before showing up.


