Free shipping on qualifying domestic orders over $50
Stamp Carving Process with Genea
January 16, 2017
Hello beautiful souls,
Wow this round was a big learning curve for me, but I am so excited with what I've learned and the confidence that was built after the experience. I haven't done a block print since my high school days and I graduated in 1997. I will say this new speedy carve block is so much easier to carve than the old school linoleum blocks! The new speedball lino cutter is especially awesome too since you can store all of the blade tips inside the handle.
So let's take a look at my learning process so I can share with you what worked, what didn't and how to handicap your way around making things work with a few different programs and some creativity! I must admit design isn't one of my strong points even though I used to doodle all over my pages. Zentangle was a big help on figuring out some different design patterns to repeat for my block. I knew I was going to do an eye since eyes have been my obsession my entire life. I even sign my work with an eye next to it. I also love hearts and love, so a heart was going to be in the design as well. My signature eye has a swirl center so I used that style for my block. To start I grabbed a piece of paper and drew a rectangle the same size as the block so I knew how big my design needed to be.

As you can see from the first drawing the block design changed a few times before I settled on the final design. The first design wasn't quite it, the second design was too complex, and the 3rd drawing was just right! Next I outlined the drawing in black marker. Before I finished the other side of the drawing I had the amazing idea to take a photo, upload it into photoshop and mirror the image so that my design would line up more evenly.

As you can see the mirror messed up my swirl eye. I used the paintbrush tool in photoshop to fix up my image. I had just downloaded the program called inkscape that does image editing to use with my cricut machine so I used that program to refine my image and turn it into a vector image.

I just LOVE how the program smooths out all of the jaggedy lines and makes it look awesome! I aldo decided to do an inverted image to see if that would be easier to do for the block carving.

The lines looked easier with the first image so I went along with that taking care to carve out the white spaces instead of the black. Now how the heck to get this image transferred to the block?! I only have an inkjet printer not a laser jet that works for super awesome image transfers so I had to get creative. I tried to use alcohol on the block and press the marker inked image over it to transfer the image with little luck. I did some searching for help and found out you could run parchment paper through your printer and try to transfer the image that way. I taped parchment paper to cardstock and sent it through the printer. Hooray! I was able to get some ink on the parchment to transfer to the block! My first transfer didn't go so well and when I tried to remove the ink with nail polish remover it smeared like this.

Well poop! This means I have one more chance to get it right so I could carve my block. So I flipped my block over and carefully tried again.

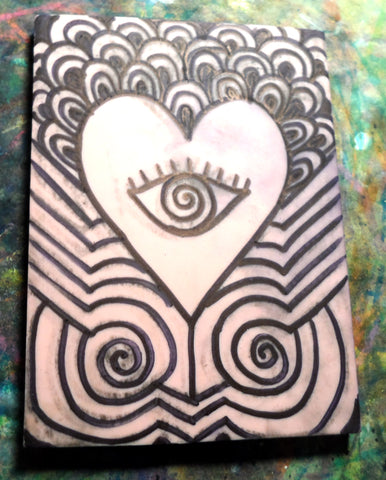
The image transferred, but it was so light. I took my marker and drew over the block to make the image easier to see for carving.

Next I went to work carving my block.

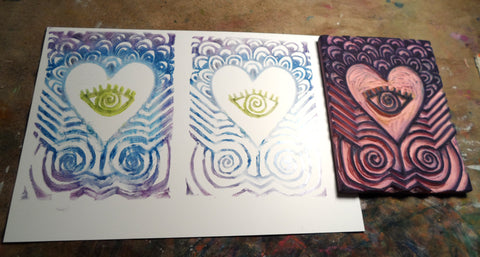
Oh man the block turned out so awesome! I did a test print with some pigment inks on yupo paper.

If you haven't tried out this paper yet, its pretty awesome. I would say it's almost like using photo paper for art paper. The paper has a glossy finish to it and it does take a little while longer for it to dry since the inks seem to sit on top of the paper before being fully absorbed. Next I used some distress inks to do a few more prints.

I had an idea to do an awesome mandal a piece so I gessoed a piece of wood, water colored on top of it and then used my block to do some prints with inks on top.

Next I added some larger painted spots with some dina wakley paints in Fuchsia and Ocean. Here is the finished piece that I am calling "Infinite Possibilities".

What artistic hurdle have you overcome and how did is make your design stronger and build your confidence?
Love, light, and creativity,
Genea
Leave a comment
Comments will be approved before showing up.

