Free shipping on qualifying domestic orders over $50
Make an Artsy Tote bag with Martice Smith II
September 21, 2015 3 Comments
Today's guest blogger is artist Martice Smith II. Martice is an illustrator, designer and instructor who likes to mix traditional with digital media, vibrant colors, textures, and urban culture. You can see more of her work on her blog http://uneekart.blogspot.com/
Enjoy!
Stencil Metallic Tote Bag by Martice Smith II
Gather your materials:
12" x 12" Stencils used:
Sturdy fabric (canvas works great; see photo 1 for sizes needed): 1 to 1 1/2 yards depending on what size you want
Acrylic, neon, and metallic paints
Bucket of water
Sewing Machine
Metallic thread (same color as metallic paint)
Low-tack tape, optional
Fabric Glue
Heavy Duty clips
Hello! Martice here, sharing a fun tutorial on how to design and make your very own designer tote bag with a couple of Artistcellar’s most popular 12” x 12” stencils.
Now, I have to ask you: are you an artist who hauls art supplies and artwork around in those hideously designed plastic grocery bags? (Yes, I’m guilty, too!) Well today, you and I are gonna put a STOP to those shenanigans and flaunt our creations with style. Your beautifully designed tote bag will, not only be a great conversation starter, it will also inspire you to speak about your art with confidence ...what’s better than that?!
Let’s get started!


STEP 1: Paint the fabric
I'm painting fabric that I picked up at a local thrift store. I've been holding onto it for almost a year and I finally came up with an idea of what to make out of it.
Since I'm always in need of storage, (especially during travel workshops and outdoor painting adventures) I knew that I had to create something to accommodate those needs. It sure beats carrying around a grocery bag! Notice that my fabric is, overall, a dark color with patterns. (Most of the original pattern will be painted over.) I started with an off-white as my base color because I want the next layers of colors to look as bright as possible.
Try dry brushing your next layer of color.
Apply your next color(s) with a dry brush. Notice that some of the color in previous layer shows through. This adds visual texture and dimension!
Allow each layer to thoroughly dry before adding the next color.
STEP 2: Stencil it!
Lay down the Sri Yantra (Sacred Geometry series) stencil and use a stencil brush to apply gold metallic paint (Champagne Gold). Repeat this in several areas.
Cover parts of the stencil with tape to create your own design.

Lay down Reims (Cathedral Series) stencil and choose different parts from this stencil to add to your fabric.

STEP 3: Design bag patterns, Cut out fabric
Find a simple bag design that you like or design one of your preference. Study the overall shape and note where the seams are. (I'll be making mine from a simple design based on a bag I purchased.)
Some elements, like seam binding and a pen loop, will be added.
Cut one piece of fabric on the fold (18" long and 9.5" wide).
(Optional: if you want the inside of your bag decorated, go ahead and decorate the wrong sides of the fabric pieces now. It will be difficult to do so after sewing it.)
Cut two pieces of fabric for the sides (7" x 5").
Cut two pieces of fabric for the handles (9" x 1/2").
Cut two pieces of fabric for the seam binding (18" x 1.5").
You still with me? Great! Let’s get stitchin’...
STEP 4: Sew bag together
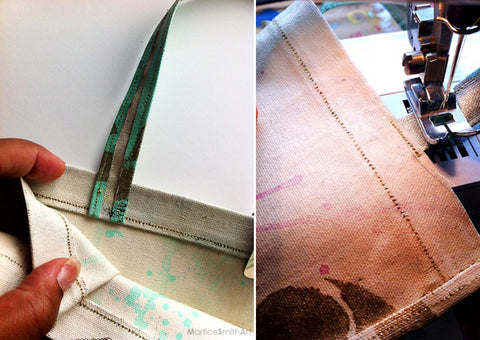
Fold top edge down 1/4". Stitch.
Fold edge down 7/8". Stitch along the first stitched line.

SIDES
1. Fold top edge down 1/4". Stitch.
Fold edge down 7/8". Stitch along the first stitched line.
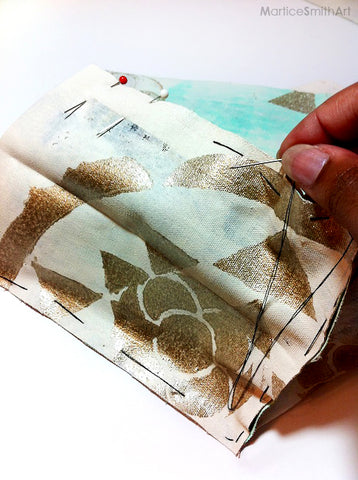
Fold in half, right sides together. Crease.
Mark a dot at 2 1/4" up, from the bottom.
Starting at the dot, make a diagonal crease from the dot to the bottom left and bottom right corners. (This should now look like a triangle.)

2. Pin sides to bag, wrong sides together. Baste stitch to hold in place.
Be careful going around the curves at the bottom. They are a bit tricky to manipulate!
3. Stitch sides and bag together, 1/4" from the raw edge.

STEP 5: Seam Binding
I like creating my own seam binding because it matches my bag perfectly and it's a way to use up fabric scraps.
Fold in 1/4" on each side of the fabric strip.
Stitch 1/4" from the fold.

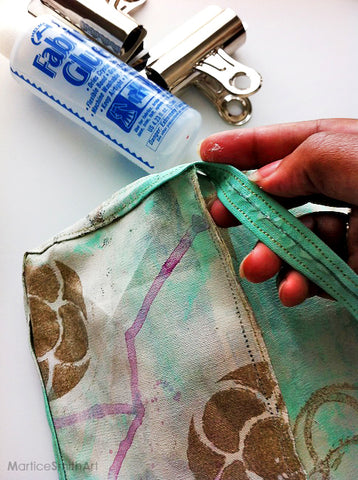
Attach the seam binding to the bag with industrial fabric glue. (Remember to take care of those curves at the bottom of the bag!)
Crease the seam binding, in half, over the edges (see photo).


STEP 6: Attach Handles
Mark 2" in from the edge of the bag on both sides. Center the handle on this mark, on the inside of the bag.
Glue handle in place. (Use a heavy duty clip to hold handle in place while glue sets.)(Optional: create a pen holder loop by sewing a scrap piece of fabric (the same way you did the seam binding) to the edge of the bag. Seam binding will also cover the edge. See photo, above.)

Topstitch handle (on right side of fabric).
Erase pencil markings.

STEP 7: Embellish tote bag!
Decorate your bag any way you want. Add more stenciling, doodles, paint, add creative lettering... whatever you wish!
I wanted a bright, neon color to offset the pastel tones so I decided to use irRESISTible Neon Pico Embellisher in Electric Purple. (This has a glossy finish with subtle, raised texture.)

Check out the inside and side views! (Don’t let the small size deceive you - there’s plenty of room in here!)
Triangle shapes were added in random areas on the bag.
(Optional: You can spray a clear varnish on your bag to protect it from dirt. A clear varnish is great because it repels moisture and allows you to clean up with a damp cloth.)
Thank you for visiting us today! I hope you have enjoyed this tutorial.
Happy creating!
3 Responses
Linda
October 01, 2015
Nice bag. Hadn’t thought of painting over a fabric with an undesirable print. Look out upholstery fabric!
Indigene Theresa Gaskin
September 23, 2015
Oh, I’m absolutely going to try this! You did an amazing job, but then again, you’re soooo talented!!! Thanks for sharing this.
Leave a comment
Comments will be approved before showing up.


Tak
December 19, 2015
I need several of these for my Mom! With the haldens they would be portable and make traveling with her various projects a lot easier. She has been known to bring as many as 6 quilts with her on two day trips. She keeps things in various reusable bags which means she carries around a lot of bags and is always forgetting something!